Simple User Login and Registration form with PHP
Storing user information in MYSQL Database with PHP and using the information to log each user in.
The requirements for this tutorial are code editor, local MYSQL database (I use XAMPP) and beginner level experience with PHP and HTML. It is quite common to want to know how to create a login and registration form with PHP, when one is new to the language. It might seem overwhelming at first but I promise it gets easier with time. This might also be your first encounter with the Database (MYSQL), do not fret, it is a good place to start as your search for answers to the multiple questions that will emanate from observing the code, will lead you to a good place and will help you traverse the Database using MYSQL.
The most important thing about "User Login and Registration" is how secure the information in the database is, I am saying this because this is an introduction to what is attainable and not a production level example. In subsequent articles I will write about how you could secure your information, by hashing the user's password; the difference between encrypting and hashing; PHP Sessions and cookies etc.
Lets start by creating our various files connection.php, connection_error.php, home.php, login.php, login_action.php, index.html, register.php, register_action.php. In your index.html and this code
<!DOCTYPE html>
<html lang="en">

<head>
    <meta charset="UTF-8">
    <meta http-equiv="X-UA-Compatible" content="IE=edge">
    <meta name="viewport" content="width=device-width, initial-scale=1.0">
    <title>Home page</title>
</head>

<body>
    <main>
        <button><a href="register.php">Register</a></button><br>
        <button><a href="login.php">Login</a></button>
    </main>
</body>

</html>
This simply navigates to the registration and login page. Now add this code to your register.php
<!DOCTYPE html>
<html lang="en">

<head>
    <meta charset="UTF-8">
    <meta http-equiv="X-UA-Compatible" content="IE=edge">
    <meta name="viewport" content="width=device-width, initial-scale=1.0">
    <title>Register</title>
</head>

<body>
    <main>
        <form action="register_action.php" method="post">
            <label for="name">
              Name:
              <input type="text" name="name" id="name">
            </label>
            <label for="email">
              Email:
              <input type="email" name="email" id="email">
            </label>
            <label for="password">
              Password:
              <input type="password" name="password" id="password">
            </label>
            <label for="verify-password">
              Re-enter password:
              <input type="password" name="verify-password" id="verify-password">
            </label>
            <button type="submit">Submit form</button>
        </form>
    </main>
</body>

</html>
Notice the name attribute in the input elements, this is what PHP will use to identify each input to get their value. Now lets create a database and database table where we'll store the users. if you have your preferred local database set up, you should run it and if you are using XAMPP start your Apache and MYSQL module.
![XAMPP Control Panel v3.2.4 [ Compiled_ Jun 5th 2019 ] 01_08_2021 3_27_26 am.png](https://cdn.hashnode.com/res/hashnode/image/upload/v1627759860230/ByQmcRGvs.png?auto=compress,format&format=webp)
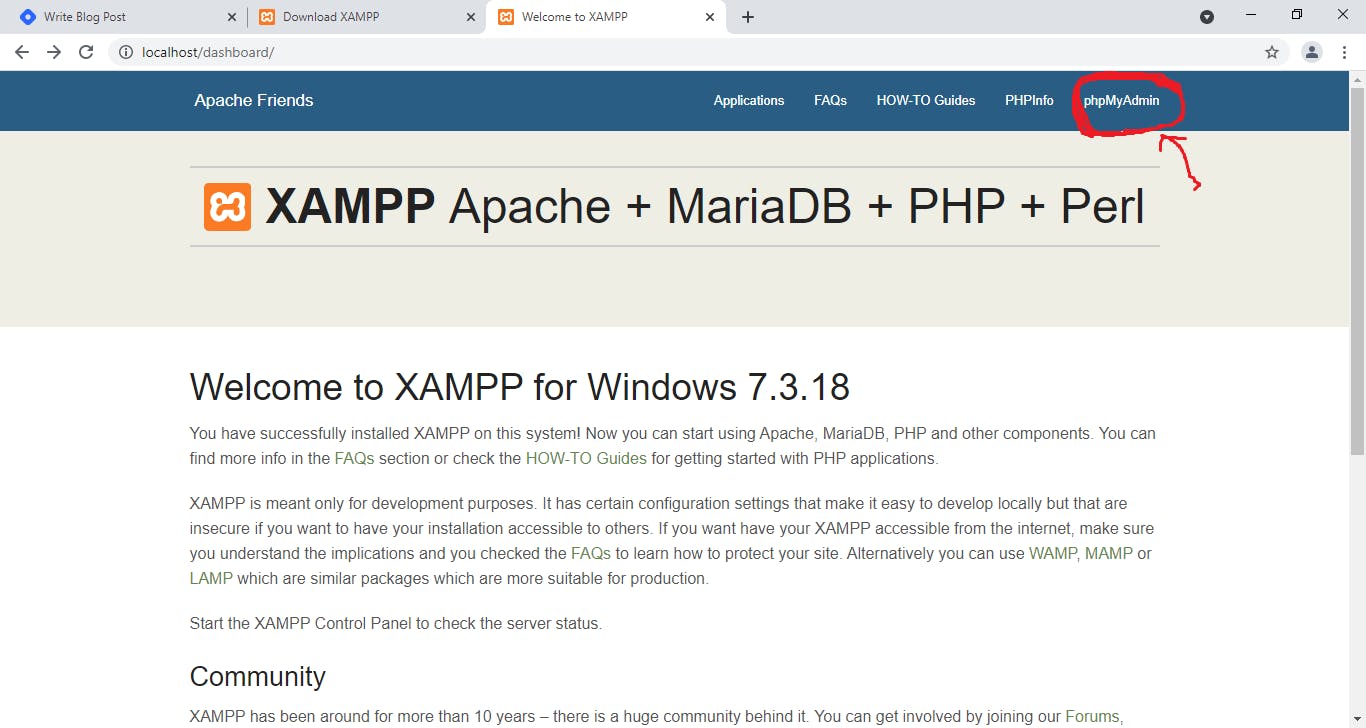
Type localhost in your favourite browser, then visit, when it opens click on the phpMyAdmin in the navigation bar.

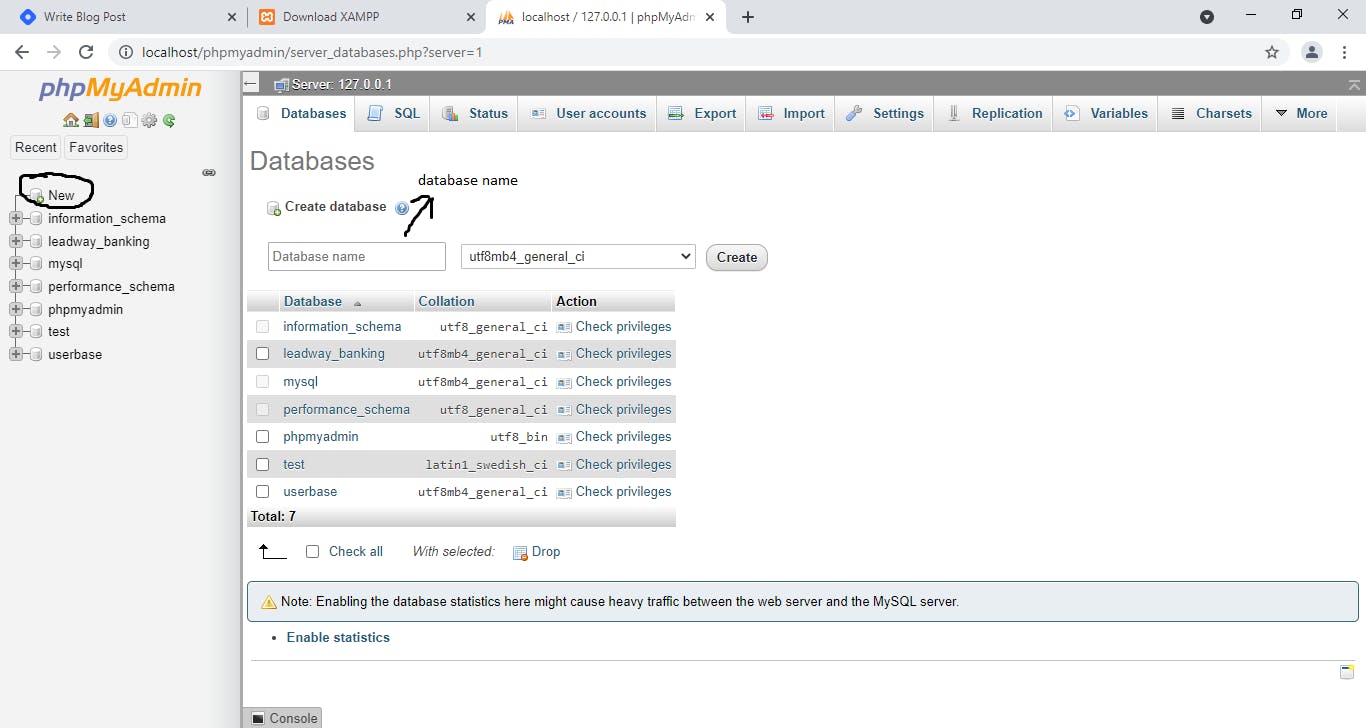
click on 'new' to create database, enter database name 'myapp' then create.

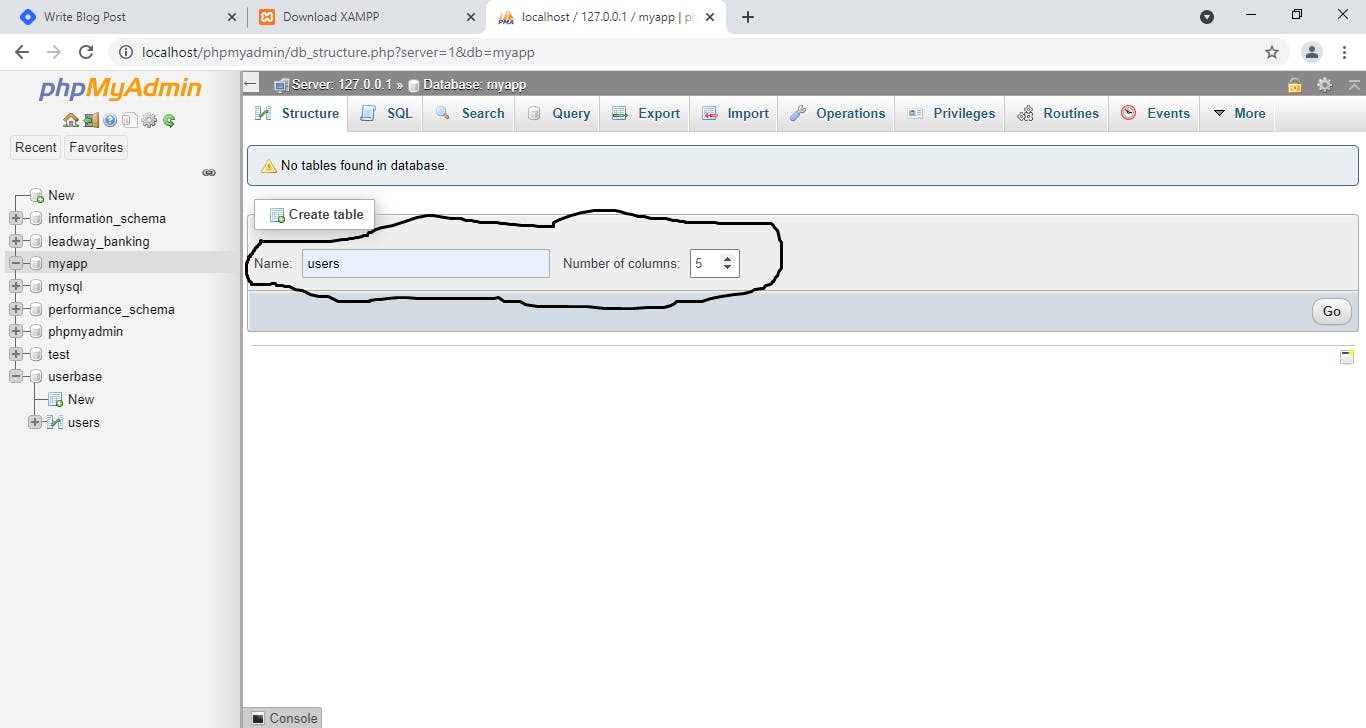
now create a table with 5 columns where user information will be saved.

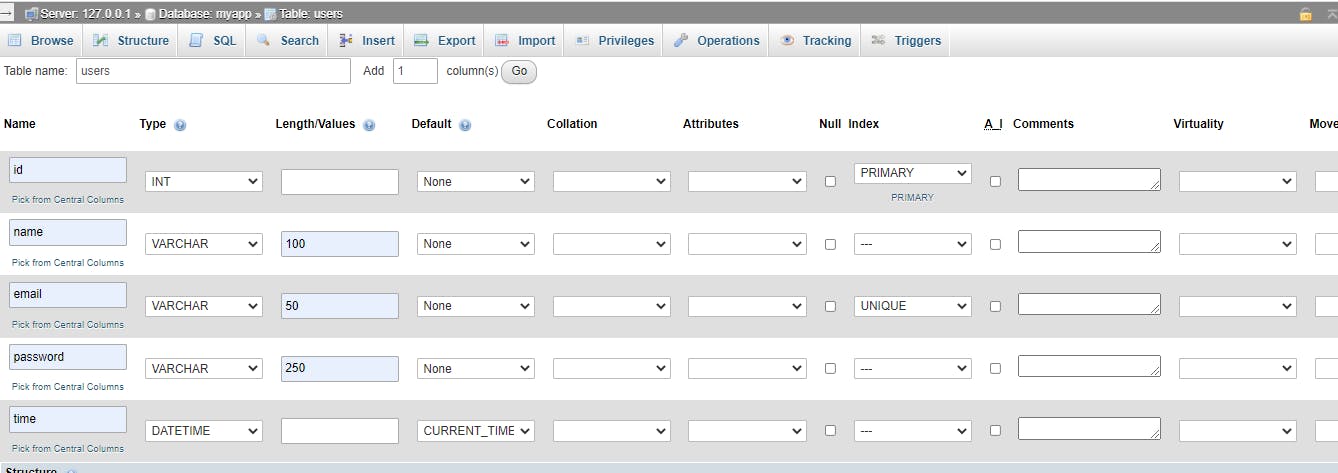
You fill the columns like the image below and save.

Now that we have the database setup, add this code to your connection.php file
<?php

$db_name = "myapp";
$db_username = "myappusername";
$db_password = "";
$servername = "localhost";

$conn = new mysqli($servername, $db_username, $db_password, $db_name);

if ($conn->connect_error) {
  header("location:connection_error.php?error=$conn->connect_error");
  die($conn->connect_error);
}

?>
The above code handles your connection to the database, the
$conn = new mysqli($servername, $db_username, $db_password, $db_name); this variable contains the object oriented way of connecting to the MYSQL server, it takes the database name, database username, server name, database password as argument. The rest of the code which is the 'if statement' is saying if connection error is true, redirect to the error page.
Add the following code to the connection_error.php file
<!DOCTYPE html>
<html lang="en">
<head>
  <meta charset="UTF-8">
  <meta http-equiv="X-UA-Compatible" content="IE=edge">
  <meta name="viewport" content="width=device-width, initial-scale=1.0">
  <title>Connection error</title>
</head>
<body>
<div class="flex-item-message">
            <h1 id="session-sub">Uh-Oh !</h1>
            <p id="session-sub">
                We have error connecting to database !<br>
            </p>
            <p id="session">
                <b>Error Message: </b>
                <?php
                    if (isset($_GET['error'])) {
                        echo $_GET['error'];
                    }
                ?><br><br>
                Make sure that the database login credentials are correct
                and/or the server is set up properly/responding.<br><br>
                Please try again after sometime. :)
            </p>
        </div>
        <div class="flex-item">
            <a href="index.html" class="button">Go Home</a>
        </div>
</body>
</html>
The above code displays the error message it uses the '$_GET' which handles the URL parameters passed in the current script. We will test out the project in a bit, lets add to the register_action.php
<?php
include "connection.php";
?>
<!DOCTYPE html>
<html lang="en">
<head>
  <meta charset="UTF-8">
  <meta http-equiv="X-UA-Compatible" content="IE=edge">
  <meta name="viewport" content="width=device-width, initial-scale=1.0">
  <title>Document</title>
</head>
<?php

$name = mysqli_real_escape_string($conn, $_POST["name"]);
$email = mysqli_real_escape_string($conn, $_POST["email"]);
$password = mysqli_real_escape_string($conn, $_POST["password"]);
$verify_password = mysqli_real_escape_string($conn, $_POST["verify-password"]);
if ($password === $verify_password) {
  $sql0 = "SELECT MAX(id) FROM users";
  $result = $conn->query($sql0);
  $row = $result->fetch_assoc();

  $id = $row["MAX(id)"] + 1;

  $sql2 = "ALTER TABLE users AUTO_INCREMENT=".$id;
  $conn->query($sql2);

  $sql3 = "INSERT INTO users VALUES(NULL,
          '$name',
          '$email',
          '$password',
          NOW()
        )";
} else {
  header("location:register.php");
}

?>
<body>


  <div>
    <div>
      <?php
      if ($conn->query($sql3)) { ?>
        <p><?php echo "Your account has been created successfully";?></p>
      <?php }
      else { ?>
        <p><?php echo "Error: .$sql3. <br> .$conn->error. ";?></p>
      <?php } ?>
    </div>
  </div>
<?php $conn->close();?>
</body>
</html>
Here we use the mysqli_real_escape_string($conn, $_POST["name"]); which takes two argument the first is the $conn variable we declared in the 'connection.php' script and the '$_POST' method that captures inputs posted from a form. Notice how I'm trying to do everything on the backend, Next is to compare both passwords, if it matches insert in the database else go back to the registration page. The sql code $sql0 = "SELECT MAX(id) FROM users"; means that MYSQL should select the highest number of the id row rom the 'users' table, the 'result' variable queries the database to execute the '$sql0' variable. The '$row' variable gets the max id and you tell MYSQL to always increment the id by 1 whenever new users register.
'$sql3' gets all values and inserts it according to their position in the table. The rest of the code in the html checks if the insertion was successful, or if it encountered an error, then displays the resulting message accordingly. You can execute the code now to see the message it will display.
Now over to the login page, add the following code to your login.php
<?php
  include "connection.php";
  if (isset($_GET["InvalidLogin"])) {
    $message = "Invalid Login combination | Please try again";
    echo "<script type='text/javascript'> let message = '$message'; alert(message)</script>";
  }
?>
<!DOCTYPE html>
<html lang="en">
<head>
  <meta charset="UTF-8">
  <meta http-equiv="X-UA-Compatible" content="IE=edge">
  <meta name="viewport" content="width=device-width, initial-scale=1.0">
  <title>Login</title>
</head>
<body>
  <main>
  <form action="login_action.php" method="post">
      <label for="email">
        Email:
        <input type="email" name="email" id="email">
      </label>
      <label for="password">
        Password:
        <input type="password" name="password" id="password">
      </label>
      <button type="submit">Submit form</button>
  </form>
  </main>

</body>
</html>
include "connection.php" helps with access to the server. The form will be posted to the login_action.php. Add the code below to your login_action.php.
<?php
include "connection.php"


$user_email = mysqli_real_escape_string($conn, $_POST["email"]);
$user_password = mysqli_real_escape_string($conn, $_POST["password"]);

$sql0 = "SELECT * FROM users WHERE email='".$user_email."'";
$result = $conn->query($sql0);

if (($result->num_rows > 0)) {
  $row = $result->fetch_assoc();
  if ($user_password === $row["password"])) {
    $GLOBALS["LoggedIn_User"] = $row["id"];
    header("location:home.php?OBS=$LoggedIn_User1");
  } else {
    die(header("location:login.php?InvalidLogin=true"));
  }
}
?>
The above variables $user_email, $user_password gets the posted values from the login form. '$sql0' selects everything from the users table where a row in the table contains the exact email ($user_email) posted from the login form. $result queries the database.
The rest of the code checks if the email received exists in the database table, if it does, it compares the password related to it, with the password received from the form. If both return true it redirects to the customer's home (home.php) else it returns to the login.php page triggering the if statement in the login.php script that alerts the login error. In the 'home.php' add the following code
<?php
include "connection.php";
  session_start();
?>


<!DOCTYPE html>
<html lang="en">
<head>
  <meta charset="UTF-8">
  <meta http-equiv="X-UA-Compatible" content="IE=edge">
  <meta name="viewport" content="width=device-width, initial-scale=1.0">
  <title>Document</title>
</head>
<body>
<?php
  $id = $_GET["OBS"];
  $sql0 = "SELECT * FROM users WHERE id=".$id."";
  $result0 = $conn->query($sql0);
  $row0 = $result0->fetch_assoc();
?>
  <h1> Welcome <?php echo $row0["name"]; ?> </h1>
</body>
</html>
The script above uses the '$_GET' method to get the query in the weblink, that is in turn used to search the database as the id, that is how the script knows it the exact user it is to salute. This isn't the best way to do this as it exposes other users. The best solution for this, is the PHP Sessions, it is not in the scope of this article. I will handle Session in later articles. And that a wrap on this tutorial. Thank you for reading.
You should checkout other related articles.
